前言
上一篇:《文件系统有很多,但这几个最为重要》介绍了procfs(进程文件系统的缩写),包含一个伪文件系统(启动时动态生成的文件系统),用于通过内核访问进程信息。这个文件系统通常被挂载到 /proc 目录, /proc中不仅仅放了进程相关信息,也存放着很多系统相关的信息。这些信息都是内核开放给用户的,/proc 就是用户与内核直接交互的一个入口。从内核的角度看,内核是通过怎么样的方式把这些信息暴露给用户呢?这篇笔记我们来学习一下:
内核创建proc节点的例子
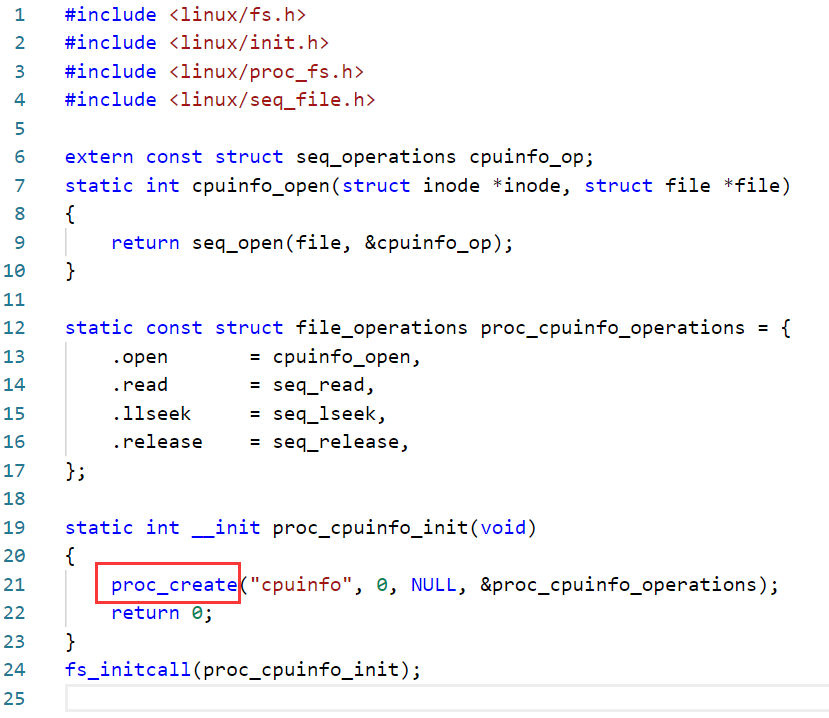
我们先来看一个例子(Linux-4.9.88\fs\proc\cpuinfo.c):

这就是创建/proc下cpuinfo这个节点的相关代码,有了cpuinfo节点,我们就可以通过访问这个节点来得到cpu的一些信息:

从以上代码中,我们可以看到,其用proc_create这个函数来创造相关节点的,这个函数是一个内联函数,存放在Linux-4.9.88\include\linux\proc_fs.h下:
static inline struct proc_dir_entry *proc_create(
	const char *name, umode_t mode, struct proc_dir_entry *parent,
	const struct file_operations *proc_fops)
{
	return proc_create_data(name, mode, parent, proc_fops, NULL);
}
知识点:什么是内联函数?
内联函数简单来说就是编译器将指定的函数体插入并取代每一处调用该函数的地方上下文,从而节省了每次调用函数带来的额外时间开支。
一般用于能够快速执行的函数,因为在这种情况下函数调用的时间消耗显得更为突出。这种方法对于很小的函数也有空间上的益处,并且它也使得一些其他的优化成为可能。
这么一看,似乎与宏有点相似?与宏有何不同?
以上介绍摘选自百度百科,关于内联更详细的介绍可自行查阅。
接着上面,proc_create函数有四个参数,分别为:
name:要创建的文件名。
mode:文件的访问权限。
parent:父文件夹的proc_dir_entry指针。
proc_fops:改文件的操作函数。
看到这个函数,有没有感到很熟悉?我们在学习驱动基础的时候,有用到了device_create函数来创建节点:

device_create创建的设备节点存放于/dev目录下,而proc_create函数创建的与系统信息相关的节点存放于/proc目录下。既然它们这么相似,下面我们就模仿编写驱动的方式来编写我们关于proc的测试代码。
proc实践
我们模仿字符设备驱动的编写方式,来编写基于proc的“驱动”。首先需要创建一个文件操作结构体hello_proc_operations,创建一些hello_proc_open、hello_proc_close、hello_proc_read、hello_proc_write填到这个操作表里:
/* 微信公众号:嵌入式大杂烩 */
#include <linux/fs.h>
#include <linux/init.h>
#include <linux/proc_fs.h>
#include <linux/module.h>
#include <linux/uaccess.h>

static char kernel_buf[1024];

#define MIN(a, b) (a < b ? a : b)

static int hello_proc_open(struct inode *node, struct file *file)
{
	printk("%s %s line %d\n", __FILE__, __FUNCTION__, __LINE__);
	return 0;
}

static ssize_t hello_proc_read(struct file *file, char __user *buf, size_t size, loff_t *offset)
{
	int err;
	printk("%s %s line %d\n", __FILE__, __FUNCTION__, __LINE__);
	err = copy_to_user(buf, kernel_buf, MIN(1024, size));
	return MIN(1024, size);
}

static ssize_t hello_proc_write(struct file *file, const char __user *buf, size_t size, loff_t *offset)
{
	int err;
	printk("%s %s line %d\n", __FILE__, __FUNCTION__, __LINE__);
	err = copy_from_user(kernel_buf, buf, MIN(1024, size));
	return MIN(1024, size);
}

static int hello_proc_close(struct inode *node, struct file *file)
{
	printk("%s %s line %d\n", __FILE__, __FUNCTION__, __LINE__);
	return 0;
}

static const struct file_operations hello_proc_operations =
{
    .owner	 = THIS_MODULE,
	.open	 = hello_proc_open,
	.read    = hello_proc_read,
	.write   = hello_proc_write,
	.release = hello_proc_close,
};

static int __init hello_proc_init(void)
{
	proc_create("hello_proc", 0, NULL, &hello_proc_operations);
	return 0;
}

static void __exit hello_proc_exit(void)
{
	remove_proc_entry("hello_proc", NULL);
}

module_init(hello_proc_init);
module_exit(hello_proc_exit);
MODULE_DESCRIPTION("proc test");
MODULE_LICENSE("GPL");
最上边的那个例子中用了一个fs_initcall宏,这与module_init的底层是差不多相同的(有宏参数不一样):
① module_init -> _initcall -> device_initcall -> _define_initcall
② fs_initcall-> _define_initcall
为了方便,我们直接用module_init 。
Makefile文件:
KERN_DIR = /home/book/100ask_imx6ull-sdk/Linux-4.9.88

#  -C 表示将当前的工作目录切换到指定目录中,M 表示模块源码目录, modules 表示编译模块
all:
	make -C $(KERN_DIR) M=`pwd` modules

clean:
	make -C $(KERN_DIR) M=`pwd` modules clean
	rm -rf modules.order

# obj-m 表示将 proc_test.c 这个文件编译为 proc_test.ko 模块
obj-m	+= proc_test.o
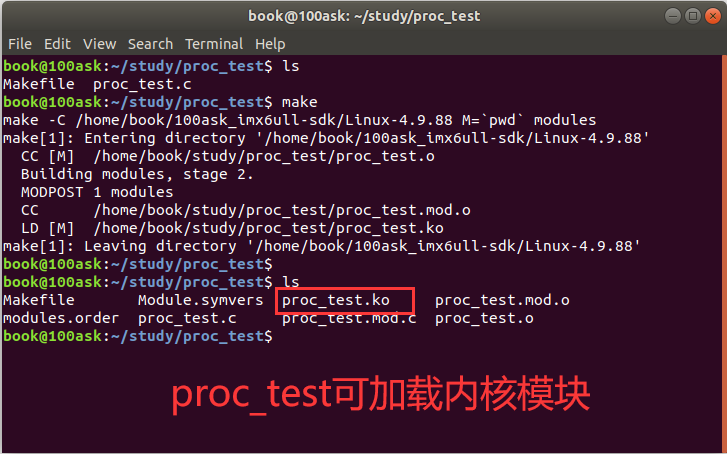
编译:

传到板子里测试:

可以看到,我们已经成功地在proc中留下了一个hello_proc小脚印。可以看到,我们创建的基于/proc下的“驱动”与创建基于/dev下的真实的设备驱动的思路及套路是很相似的。这些都是属于内核的范畴,都是属于内核的东西,内核把想给我们能直接使用的东西(文件)都放于/proc、/dev等目录下,我们在应用端就可以很方便地访问这些文件开发我们的应用。


